It’s summer (finally) and I’m happy to have landed on Cape Cod. This year our whole little family of four will be spending the entire time here. The boys are working at two of my favorite North Truro establishments, which is fun, because I get to see them in action when I’m out for lunch.
It’s also pretty easy to celebrate the season at home. StyleCarrot partner Wayfair, which is sponsoring this post, asked me to share some tips using items from its Kitchen and Tabletop section. Well, that was easy.
Obviously, I headed right for the drinkware and barware page. My cabinet of cocktail essentials was not nearly as stocked as one might imagine. This stainless steel cocktail muddler with copper finish mashed up those organic raspberries quite nicely. What to pair with it? Dry Line Rosé Gin from South Hollow Spirits, right here in Truro.
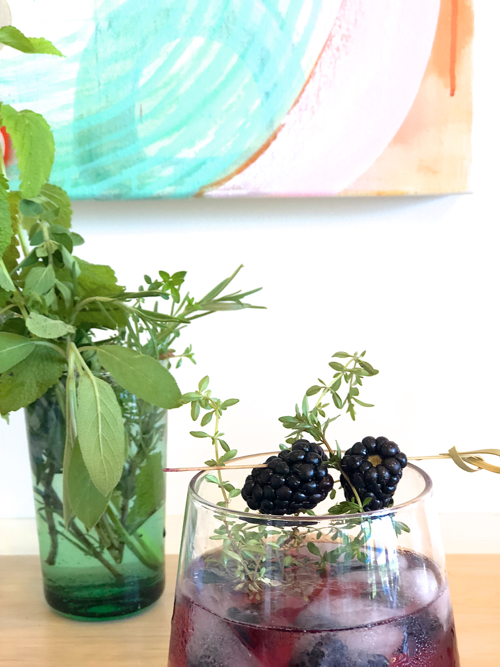
A rose gold cocktail shaker and a set of martini glasses with the simplest of lines makes for an easy preparation and elegant presentation. Garnish? Yes please. Lemon thyme and lemon verbana from my backyard herb garden.
Not feeling like an alcohol-soaked afternoon? A metal straw and homemade fruit-filled ice cubes in Pellegrino works too.
Or fruit-soaked sangria in a stemless wine glass. I’m loving these lemongrass picks for perching garnishes on the rim.
A glimpse of my garden. Yeah, it’s a bit unkempt, but the mess is mostly the stuff growing on the hill behind it. The left photo pictures chives with fading purple blooms, along with sage and lemon verbena. On the right is lemon thyme, used as ground cover.
And here’s the whole setup. Happy summer everyone.
Every year we plant tomatoes in our little raised garden behind our house in Cape Cod. We’re not exactly dedicated green thumbs, so results are mixed. We did well with grape tomatoes, as we often do, but the slightly larger tomatoes we planted were ravaged by some sort of animal. Chipmunks perhaps. Most of the herbs grew gorgeously, except the dill which was completely chewed up by an unsavory little creature.
In cooperation with Wayfair, I decided to bake a tomato tart to show off my harvest. The local farmers’ market provided supplemental ingredients. Namely, heirloom tomatoes.
A tomato tart looks best with an assortment of colors. I used red and yellow.
These are the tomatoes from my own garden, along with my basil and parsley. And that’s the kitty, wondering if those leaves are good enough to eat.
Step one, brown the onions. A good use for local sea salt, another farmers’ market purchase. My husband let me use his prize possession—his cast iron skillet. It worked really well.
I used herbed goat cheese knowing it would provide maximum flavor with minimal effort. The home gown basil and parsley were mainly for show, and a bit of texture.
I whisked one egg (laid by one of my brother-in-law’s chickens) with two percent milk to make an egg wash for the crust.
After unrolling the ($15!) puff pastry and pressing it into a buttered, nonstick shallow baking pan, I crumbled in the herbed goat cheese and added thin slices of cheddar. Any kind of cheese will work; we just happened to have cheddar. But no cheese grater, hence the slices.
Next I layered the delicious caramelized onions and sprinkled on more salt and pepper.
Then I sliced the gorgeous tomatoes and spread them across the top. First the yellows, then the reds. Then I threw on the cherry tomatoes, uncut, though next time I’d halve them, and sprinkled on the chopped fresh basil and parsley, and drizzled on some olive oil. Finally, into the oven for 15 minutes.
Here it is. Beautiful and delicious. Like, really, really delicious. It tasted as good the next day reheated too.
I don’t celebrate Valentine’s Day and I don’t love to bake. So why did I sign up on to share a recipe for a Valentine’s Day dessert when Wayfair asked if I’d like to participate in its “Baked With Love” campaign? I’m not sure!
I love to eat dessert (though technically I’m on a diet). I can’t resist a raspberry (allowed on the diet!) or I suppose, the chance to use pink frosting and heart sprinkles. And Wayfair’s Valentine’s Day bakeware is pretty darn cute.
So after spending this glorious snow day day drinking with my love at Saltie Girl, I spent the evening baking this raspberry lemon layer cake. It’s delicious, but don’t worry, I ate only one small piece. The rest is for the kids.
Raspberry Lemon Layer Cake
cake ingredients
2 sticks butter, room temperature
2 cups granulated sugar
1/4 cup light brown sugar, packed
3/4 teaspoon lemon extract
1 teaspoon vanilla extract
4 large eggs, room temperature
2 1/2 cups cake flour
1 tablespoon baking powder
1/2 teaspoon baking soda
1/2 teaspoon salt
1/2 cup whole milk
1/2 cup sour cream
1/2 cup fresh squeezed lemon juice
2 1/2 cups fresh raspberries
2 tablespoons all-purpose flour
frosting ingredients
8 oz. block of cream cheese, room temperature
1 stick unsalted butter, room temperature
3 1/2 cups confectioners’ sugar
2 tablespoons fresh lemon juice
1/4 teaspoon lemon extract
pinch of salt
Red food coloring
1/2 cup raspberries
Directions for cake:
Preheat oven to 350°F. Generously grease the sides and bottoms of two 9-inch pans with non-stick cooking spray. Line the bottom of each pan with a round of parchment paper and spray again.
In a large bowl combine butter, both sugars, lemon extract, and vanilla extract. Beat on medium speed for 5 minutes, scraping sides of the bowl as needed, until light and fluffy.
Add eggs, one at a time, beating well after each addition. Set aside.
In a separate bowl, whisk together cake flour, baking powder, baking soda and salt, mixing well to evenly combine. Add the dry mixture into the wet ingredients and mix on low-speed until everything is just barely combined. (You should still see some lumps and dry streaks. If you over mix the cake will be dry and dense.)
Add milk, sour cream, and lemon juice. Use a rubber spatula to fold the ingredients into the mixture, stirring until everything is incorporated. Again, do not to over mix. Set aside.
In another bowl, gently toss the raspberries with 2 tablespoons of all-purpose flour. (This prevents the berries from sinking to the bottom of the pan while baking.) Add the raspberries and any remaining flour, to the batter. Fold in by hand, using a rubber spatula, until just combined. (Don’t over mix.)
Divide the batter evenly into the prepared pans. Bake for 30-35 minutes, or until the tops are firm and slightly golden, and a toothpick inserted in the center comes out clean, or with moist crumbs.
Allow the cakes to cool in the pans for 10 minutes before gently running a knife around the edges to loosen them, and turn out onto a cooling rack to cool completely.
While the cakes cool, make the frosting.
Directions for frosting:
In a large bowl beat cream cheese and butter on medium-speed for 3 minutes until light and fluffy. Reduce speed to low and gradually add confectioners’ sugar. Add lemon juice, lemon extract, and salt; beat until combined. Increase the speed back to medium and mix about 2 minutes until creamy. Add a few drops of red food coloring and beat on high for about a minute. Add fresh raspberries and beat for another minute until blended.
Frost when the cakes have completely cooled. Decorate with abandon.
The frosted cake will stay fresh, covered and stored in the refrigerator, for 3 days. Take it out of the fridge an hour or two before serving so it can come to room temperature.
I put together a page of naked wedding cakes for the Boston Globe Magazine Weddings issue last month that I think turned out beautifully. So many local vendors sent me images of their gorgeous cakes, so I wanted to share the overflow here. I love the look of these restrained confections, though I admit, to me, the frosting is the best part when it comes to eating.
Amy Spirito Photography
Chocolate cake with vanilla buttercream and dusted with confectioner’s sugar by Flour(ish) Bake Shoppe, Beverly, Mass. Decorated with fresh apricots, blackberries, raspberries and greenery.
Henry + Mac
Coconut cake with strawberries and rhubarb by Mayflour Confections, Rockport, Mass. Flowers from Marc Hall Design.
KML Photography
Torted apple spice cake and caramel cream filling by Delicious Desserts, East Falmouth, Mass. Decorated with fresh succulents by Courtney’s Floral Creations and placed on a custom made rustic wood box. Decor and planning by Pink Polka Dot Events; wedding at Bourne Farm.
Dylan M. Howell Photography
Funfetti cake by Mayflour Confections, Rockport, Mass. Flowers by Boston Pollen; party design by Lauren S. Wells.
Kelly Dillon Photography
Carrot cake with cream cheese frosting by Mayflour Confections, Rockport, Mass. Decorated with herbs and greens by Petal Floral. Wedding design by MStarr Design.
Katie Noble Photo
Cake by Greggory’s Pastry Shop, Hadley, Mass.
Cake by Sweet Indulgences, Cranston Rhode Island.
Deborah Zoe Photography
Lemon yellow pound cake with blackberry puree and lavender buttercream filling and vanilla Swiss meringue buttercream frosting by Jenny’s Wedding Cakes. Decorated with fresh blueberries, spray roses, ivy, sweet pea, spirea, and ranunculus by Les Fleurs.
Kelly Dillon Photography
Cake by Peppers Artful Events, Northborough, Mass. Decorated with flowers by Becca Olcott.
Melissa Robotti Photography
Chocolate cake with white buttercream frosting and caramel drizzle by Katie Made Bakery, Portland, Maine. Decorated with French macaroons and fresh flowers by Emily Carter Floral Designs. Event design and planning by L.Brook Events.
Kate Arabatzis/Oh Miss Kate
Vanilla cake with the cardamom whipped cream filling, cream cheese frosting, and chocolate ganache drizzle by Oh Miss Kate.
Sour cream pound cake filled with fresh raspberries, tart lemon mousse with lemon buttercream frosting by Cakes to Remember. Decorated with fresh strawberries, raspberries, flowers, succulents, and sugar leaves.
Hello Love Photography
Marble cake with mocha buttercream by Mayflour Confections, Rockport, Mass. Decorated with fresh flowers and figs.
Lens CAP Productions
Funfetti cake with buttercream frosting by Russell Morin Catering & Events, Attleboro, Mass.
Sabrina Baloun Photography
Gold cake with chocolate mouse and fresh raspberry filling and vanilla buttercream icing by Party Favors, Brookline, Mass. Decorated with fresh flowers and topper by Alexis Mattox Design from Party Favors.
Amy Spirito Photography
Vanilla almond cake with raspberry filling and vanilla buttercream frosting and decorated with fresh wildflowers byFlour(ish) Bake Shoppe,Beverly, Mass.
Sarah Jayne Photography
Chocolate cake with vanilla buttercream frosting by The French Sisters Bakery, Littleton, New Hampshire. Decorated with a fresh garden roses and ranunculus by Apotheca Flower Shoppe. Planning by All the Fuss Events.
As I mentioned, my husband and I held a pop-up art gallery event this summer we’ve dubbed Art + Cocktails Truro. We showcased 96 works of art from about 30 different artists throughout our home on Cape Cod. Last week I posted an array of paintings and next week I will show you a sampling of the photography we exhibited.
Today, however, is Foodie Friday and we’re going to talk about a spicy peanut butter noodle recipe.
Photo by Samara Vise for StyleCarrot
In a moment of insanity I decided I wouldn’t need a caterer for the event.I figured I would spend the two days prior whipping up the food myself. After all, I had catered parties in my 20s. Ha. The guest list got out of hand and soon I had 90 RSVPs. I frantically called around and got two different gourmet take-out places to provide tuna tartare on rice crackers, filet mignon crostini, and two kinds of chicken skewers.
Photo by Samara Vise for StyleCarrot
I could take care of the rest. The rest consisting mainly crostini bar fixings, cheese boards, marinated olives, herbed nuts, and such.
Photo by Samara Vise for StyleCarrot
I needed one substantial dish though. Aiming for an Instagrammable, Pinterest-worthy event (after all I am a blogger), early on I ordered mini Chinese take-out containers made from Kraft paper and bamboo sporks. I settled on filling them with spicy sesame noodles.
Photo by Samara Vise for StyleCarrot
My son and I broke out the lobster pot. He boiled ten packages of spaghetti in two batches while I concentrated on not blowing up the blender with the peanut butter. I did a mash up of a few different spicy peanut butter noodle recipes I pulled from Pinterest pics, based on what seemed easiest and tastiest. The resulting recipe went something like this:
Garnish
Matchstick carrots
Red bell pepper
Cilantro
Boil noodles, rinse, drain. Make sure they’re not all clumpy. Mix the sauce ingredients in a blender. Pour sauce over noodles. Use clean hands to mix together. Set up your boxes, add noodles to each. Top with garnishes. You could also use cucumber, scallion, chopped peanuts, and sesame seeds. Stick a fork in it. Serve on a tray.